How to Build Your Own Website with Django
A step-by-step guide on how to create a fully functional website using Django, a powerful Python web framework.


Hello! Last week, my friends and I wanted to participate in a hackathon, and I was tasked with building a website that my friend Yash could deploy to the cloud. I didn't have any prior experience with HTML, CSS, or JavaScript, but since I know Python, I decided to use the Django framework to build the website. However, I soon found out that Django wasn't as easy and simple as I thought it would be. So, I decided to write this blog post to share an easy-to-follow guide on how to build a website using the Django framework.
Why Django
With Django, you can take web applications from concept to launch in a matter of hours. Django takes care of much of the hassle of web development, so you can focus on writing your app without needing to reinvent the wheel. It’s free and open source.
Installing Django
Go to the command line and write
pip install django
After running the command, pip will automatically download and install the latest version of Django. if any error occurs in this step I'll recommend you use venv. This tool provides isolated Python environments, which are more practical than installing packages systemwide. It also allows installing packages without administrator privileges. The contributing tutorial walks through how to create a virtual environment.
Create Django project
If you want to create a Django project in a virtual environment (venv), I can show you how to do that. However, if you prefer not to use a venv, you can skip that particular section.
Creating venv
All below you can run on the terminal or command line
C:\Users\Rohit Pimpale\Documents\django blog>python -m venv venv
C:\Users\Rohit Pimpale\Documents\django blog>venv\Scripts\activate
#activating venv
(venv) C:\Users\Rohit Pimpale\Documents\django blog>pip install django
#now venv is activated now install django in venv
Successfully installed asgiref-3.6.0 django-4.2.1 sqlparse-0.4.4 tzdata-2023.3
Start project
(venv) C:\Users\Rohit Pimpale\Documents\django blog>django-admin startproject myblog
(venv) C:\Users\Rohit Pimpale\Documents\django blog>cd myblog
#run your site on local host
(venv) C:\Users\Rohit Pimpale\Documents\django blog\myblog>python manage.py runserver
#after running this code you will get link copy paste in your brower
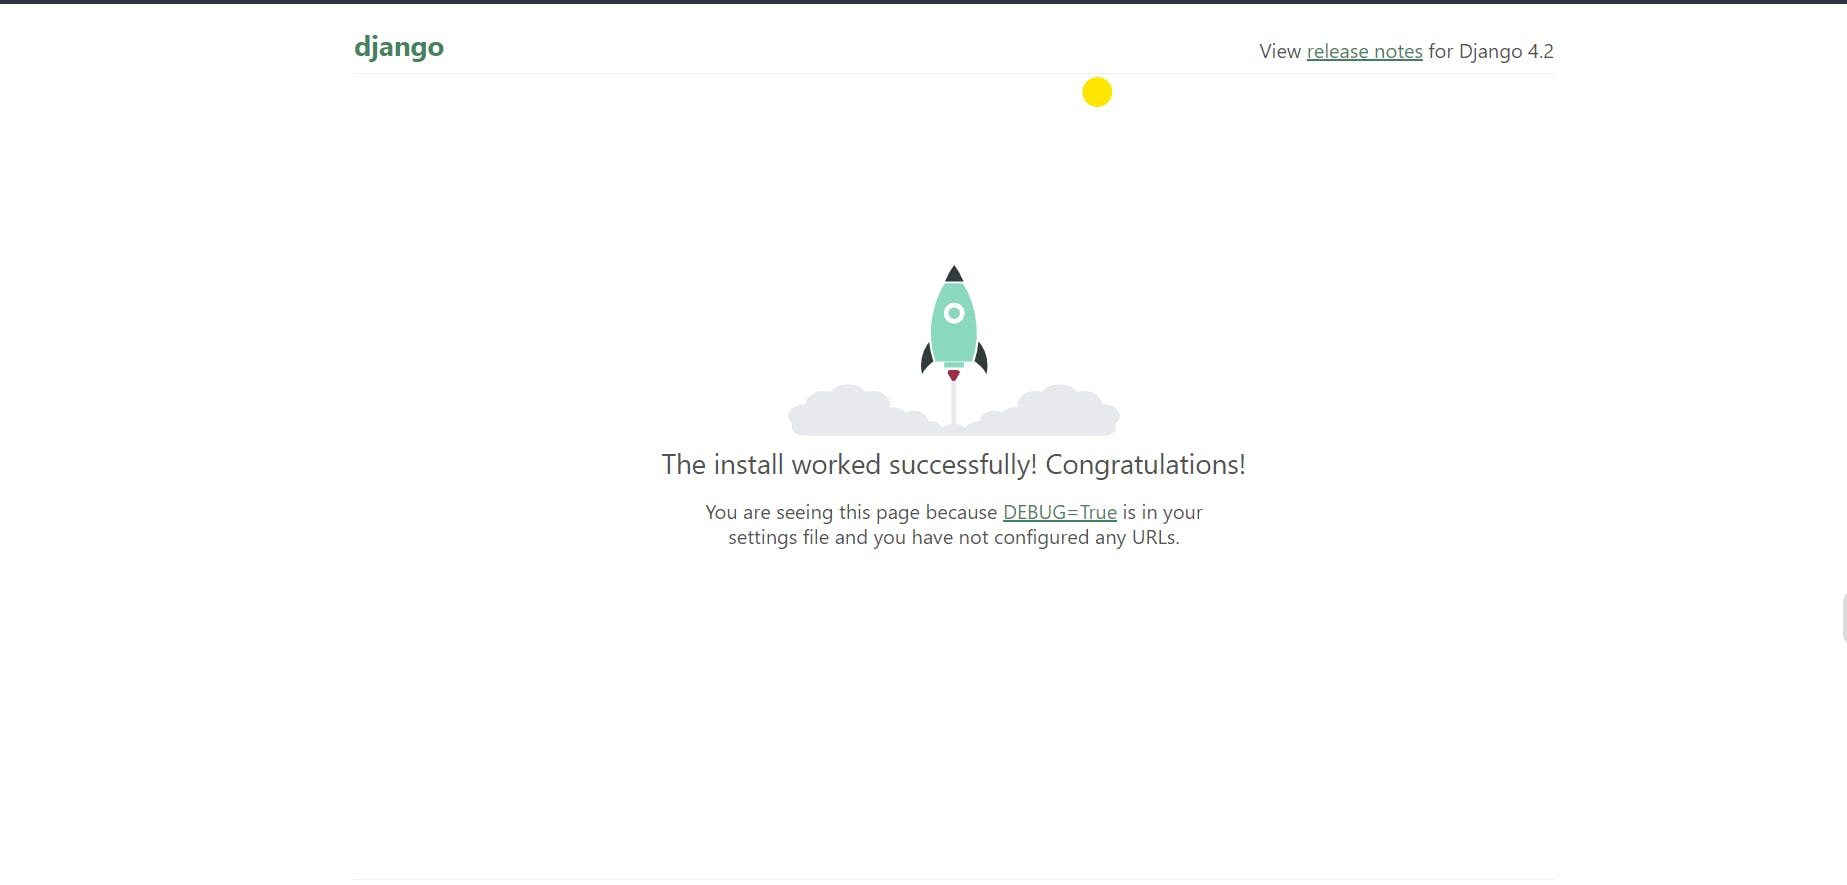
hooray!!! your project is established on your local host
Create Hello world! webpage
Now you can work your project in your favorite code editor I am using vs Code lets add views
First, create views.py in your project
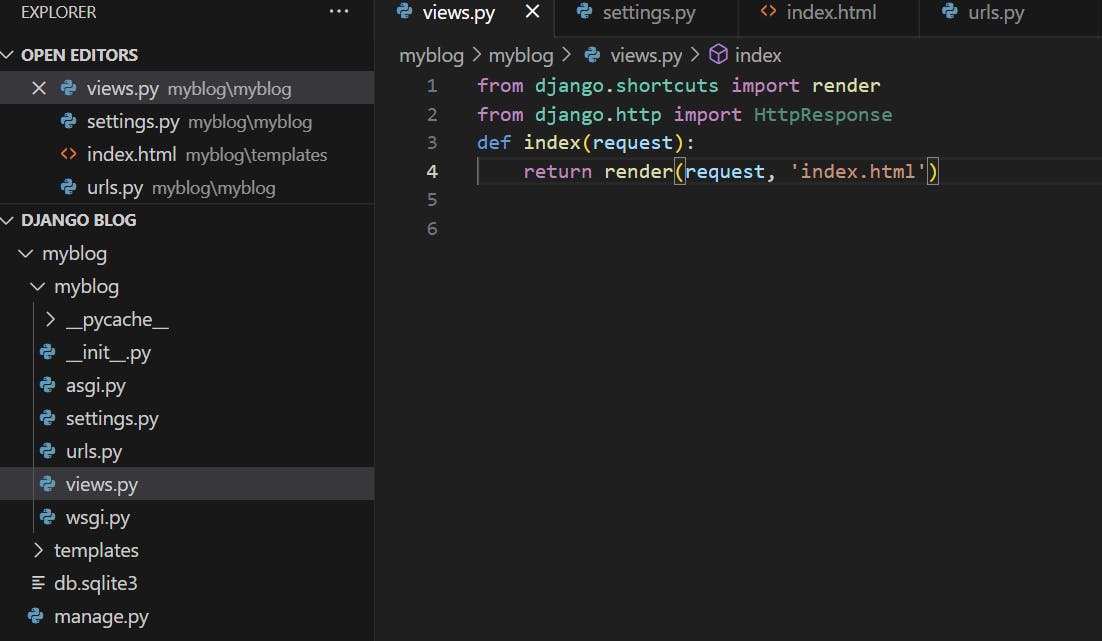
from django.shortcuts import render
from django.http import HttpResponse
def index(request):
    return render(request, 'index.html')
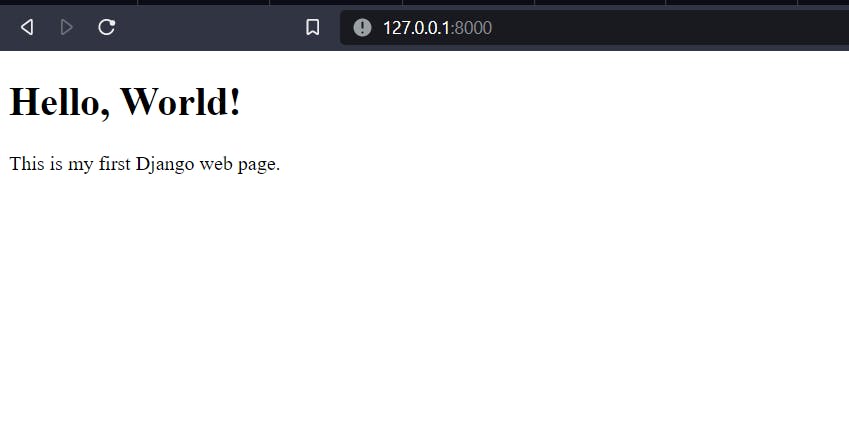
Now create a templates folder where is your manage.py file Then, create a new HTML file called "hello_world.html" within the "templates" directory and add the following code:
<!DOCTYPE html>
<html>
  <head>
    <title>Hello, World!</title>
  </head>
  <body>
    <h1>Hello, World!</h1>
    <p>This is my first Django web page.</p>
  </body>
</html>
save this file under templates as index.html
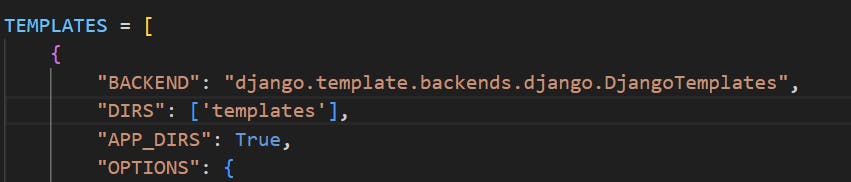
now the last step before viewing a webpage on the web go to settings.py and go to the TEMPLATES section and add 'DIRS' : [templates]
run the development server by running the following command on the terminal:
pyhton manage.py runserver
Connecting Databases
When building a website using Django, one of the first steps is to connect your website to a database. In Django, you can use different databases like PostgreSQL, MySQL, Oracle, or SQLite. SQLite is an excellent choice if you're just getting started with Django and don't need a complex database setup
To connect your Django website to an SQLite database, follow these steps:
- In your project's settings.py file, locate the
DATABASESdictionary. It should look something like this:
DATABASES = {
    'default': {
        'ENGINE': 'django.db.backends.sqlite3',
        'NAME': BASE_DIR / 'db.sqlite3',
    }
}
This is the default database configuration provided by Django. It tells Django to use the SQLite database engine and to look for a database file named db.sqlite3 in your project's base directory.
- Once you've configured your database, you can create the necessary database tables by running the following command:
python manage.py migrate
This command creates all the tables defined in your Django models and ensures that the database schema matches your models.
- Finally, you can use the Django ORM to interact with your database. Here's an example of how you might retrieve all blog posts from the
Postmodel:
from myapp.models import Post

def get_all_posts():
    return Post.objects.all()
This code retrieves all Post objects from the database and returns them as a QuerySet.
That's it! You're now connected to your SQLite database and can start building your website
Conclusion
In conclusion, Django is a powerful and widely used web framework that allows developers to build complex web applications easily. In this blog, we covered the basics of Django, including how to install it, create a Django project, and connect to a database. We also went over how to create a simple "Hello World" webpage using templates.
If you're interested in building your website using Django, I encourage you to get started today. And if you want to deploy your project to the cloud, stay tuned for my upcoming blog post on the same.
If you have any questions or want to connect with me, please feel free to reach out to me on LinkedIn or Twitter.
Thank you for reading!